Step-by-step deploying AlwaysOn on MS SQL 2012

Before Microsoft SQL Server 2012 and mechanism AlwaysOn were released, database administrators had only Database Mirroring as solution for replicating databases. It was the only option to get the "cheap" high availability. And Database Mirroring was not so good as it intended to be. Moreover, as my testings showed (and this is NOT written in documentation), it is NOT synchronous replication and transaction logs.
In short - we have studied the behavior of the database during intensive recording and different faults. What failures we saw:
- Planned shutdown of the master server (manual service stop) of the master server without any notification of the mirror server.
- Unplanned shutdown of the master server.
Oddly enough, it was a planned shutdown that showed that there is a difference between a mirrored database on the master and the mirror servers.
Therefore, I would not recommend to use Database Mirroring in production deployments, but take a look at the AlwaysOn technology.
In short about AlwaysOn
SQL 2012 AlwaysOn - is a convenient solution that can provide database high availability without the need to have Shared Storage. Configuring AlwaysOn is quite simple, and actually most of the work involves setting up a Failover Cluster based on Windows 2008 R2/2012. In these operating systems possibility to build clusters with a network folder (Witness Share) to constitute a quorum appeared.
A similar solution you might have tried in Exchange 2010/2013/2016 - Database Availability Group (DAG). As you can see, even the name hints (AlwaysOn Availability Group) - in fact, it is the same solutions.
Please take a note the following prerequisites for AlwaysOn:
- You will need Enterpries edition of SQL Server 2012.
- Windows Server Failover Cluster (WSFC) - solution work on the basic feature of the Windows Server.
- Same collation of the SQL Server for every member of the availability group.
Installing the Failover Cluster for SQL 2012 AlwaysOn
- First of all you will need to install feature of the operating system - WSFC (Windows Server Failover Cluster). There is nothing difficult, go to the basic Server Manager console and just install it. This service must be installed on both servers.
- Now we will set up the cluster. Start Failover Cluster Manager from the Server Manager snapin.
- Press Validate Configuration… in the Failover Cluster Manager.
- In the Select Servers or a Cluster dialog box add both our server which will hold the database replicas.
- In the Testing Options dialog box select Run all tests (recommended).
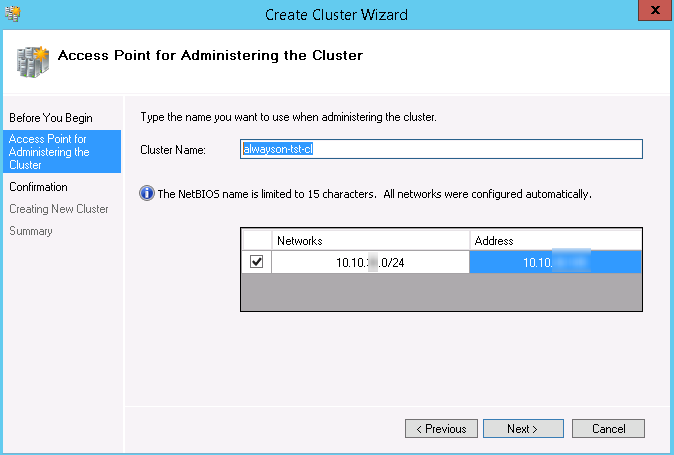
Likely you will get warnings in the testing results regarding network settings and shared storage. Warning about network settings tell us that you have no dedicated NICs for the cluster. There is no something special. Warning about Shared Storage you can also ignore as we will use network folder as witness. - In the Access Point for Administering the Cluster dialog box enter the name and IP-address for the cluster.
There is no need to create any records in DNS fot the cluster name which you enter here. Wizard will do it automatically, and aslo it will create computer object in Active Directory. If you do this by yourself manually - you will get the error and the final steps of wizard. - In the Confirmation step take off Add all eligible storage to the cluster checkbox and press Next.
After creation of the cluster you will see one more warning telling that quorum witness is not set. It's OK, very soon we will configure network share as witness. - Now we begin to set up the witness. Start Failover Cluster Manager, open our new cluster, select More Actions and then select Configure Cluster Quorum Settings….
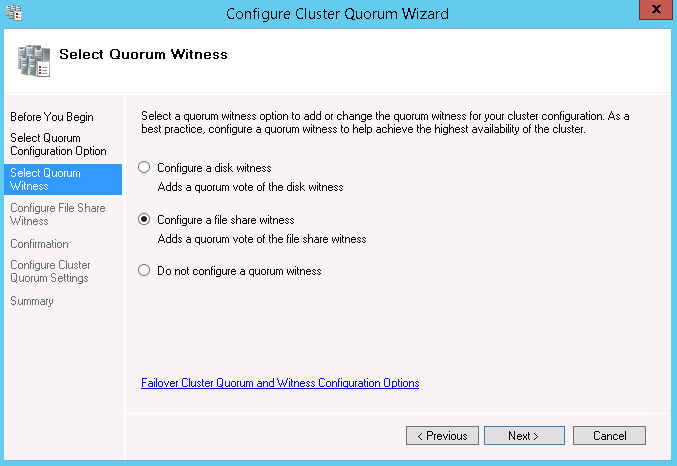
- Configure Cluster Quorum wizard will start. Press Select the quorum witness.
- Select the witness type - netowork share folder.
- Set the path to the witness share. Now I must say that you will have to manually create the folder. Share must be located on some 3rd server that is not member of the cluster.
Set the following network permissions (ACL): Everyone - Full Access.
NTFS permissions must include: the user account which you use for the setting up the cluster, and also computer objects in Active Directory - cluster and its members. In our case: alwayson-tst-1, alwayson-tst-2, alwayson-tst-cl. - Check the settings on Confirmation step and press Next.
Congratulations, cluster is created, witness is set up. Now you can check status, settings and ensure that everything is "green".
Now we proceed to the creation of the AlwaysOn Availability Group.
Creation of the AlwaysOn Availability Group
Before we start, you will surely install the MS SQL Server 2012. Please make sure, that you created dedicated user account in Active Directory for every SQL-server instance and services are running under these accounts. If you already installed SQL Servers and they are running under System accounts, then you must to fix this. The most simple way - is to re-install SQL Server. If it's impossible, then please read my article regarding this task: Changing service account for MS SQL Server 2012 and the following issues.
If you dont do that, then on the step 5 (Specify Replicas) you will get the following warning:
And if you press Yes, then on the group creation and database join stage, you will get database joining error: "Joining <availability database> to availability group <availability group> at <replica>.".
Well, let's start.
- Enable AlwaysOn support on SQL-servers. Start SQL Server Configuration Manager, and in service properties select Enable AlwaysOn Availability Groups checkbox. Then restart SQL services.
- Start SQL Server Management Studio, connect to one of our SQL servers. In the Object Exporer go to the AlwaysOn High Availability. Right click the Availability Groups and select New Availability Group Wizard…. Wizard for creating availability group will start.
- In the Specify Availability Group Name dialog box type in the name of the new group. Select any name of your choice. It's just the name of the object and will not affect on anything later on.
- In the Select Databases dialog box select the database that will be the member of availability group.
- There are multiple actions to perform in the Specify Replicas dialog box. In the Replicas tab, add second SQL-server into configuration. Automatic Failover - set if you want it (in my case I disabled it). Synchronous Commit - it is better to specify, because it indicates that the synchronous replication mode will be used as the most secure way of replication from the point of view of data protection from failure.
- Second tab needed in the Specify Replicas dialog box - is the Listener. There we will set the "connector" point to the our availability group. Using this address your application will connect to the database.
- In the Select Initial Data Synchronization dialog box select Full and specify the folder for the initial database replication between servers. All user accounts of the SQL services must have full access to the folder.
- Upcoming steps of the New Availability Group wizard does not require your interaction. As result you must get new AlwaysOn Availability Group.
At this moment I will consider our mission as completed. For you - further tests on the operation of your new cluster.
windows server 2012 (en), ms sql server (en), sql 2012 (en), windows server (en)
- Hits: 9485


